Shedding Light on Infrared Camera Technology

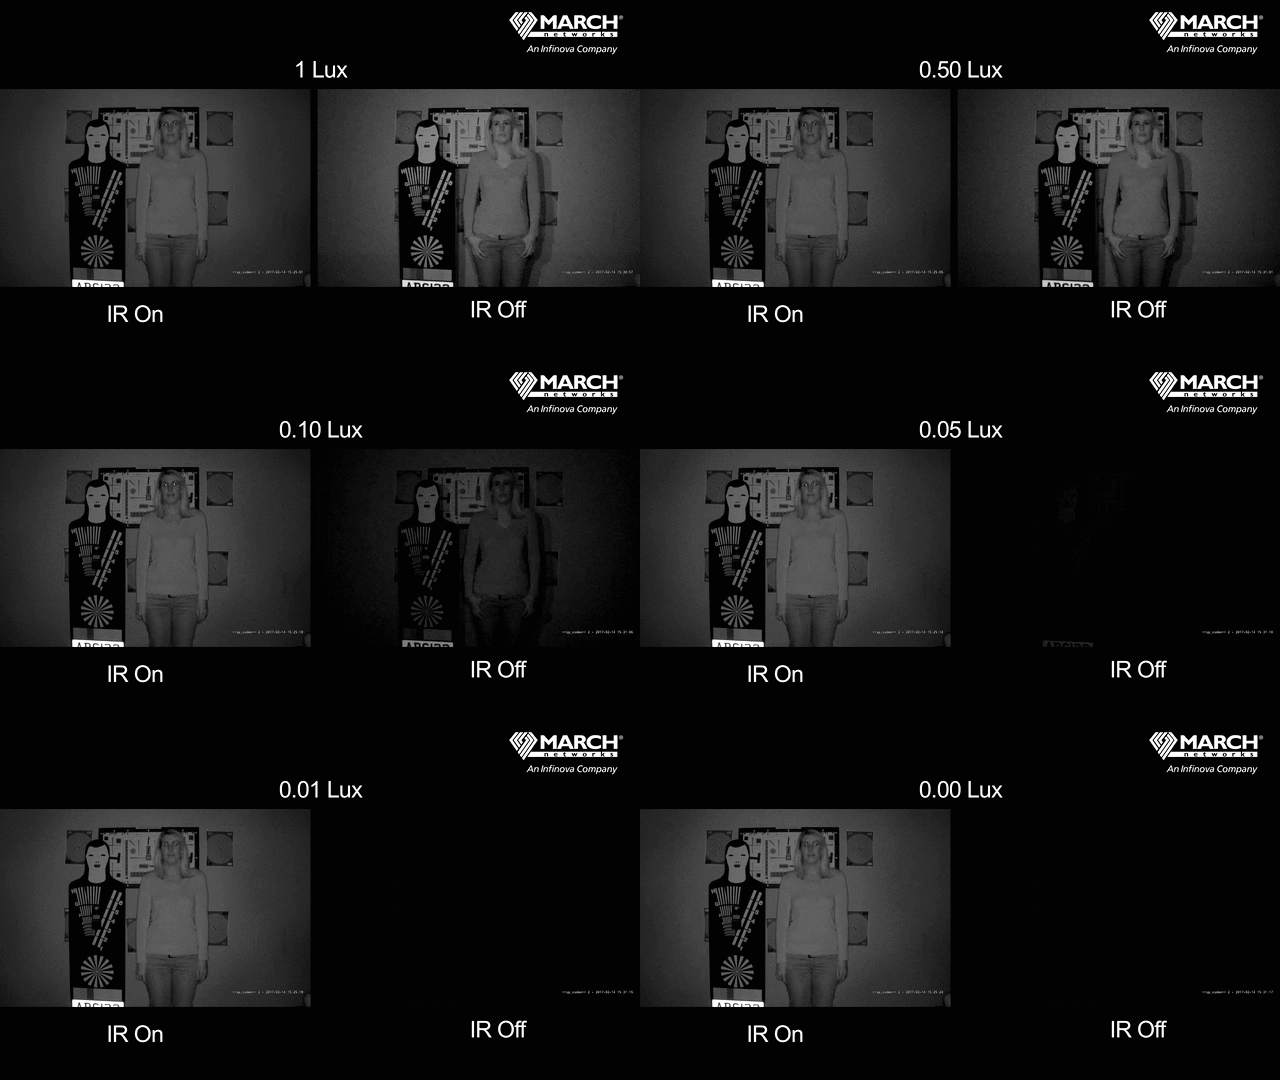
In this example, you can see what happens when IR is enabled, versus when it’s not. See how the IR camera on the left keeps illuminating the subject, even at 0 lux, while the camera on the right without IR is unable to pick up anything? Without IR, the field of view eventually goes black. Image provided by March Networks
Security is an around-the-clock job that doesn’t end just because the sun goes down. Many organizations, especially those in commercial industrial sectors such as airports, warehouses or critical infrastructure facilities, require advanced tools to provide perimeter security or monitor buildings and other assets after dark. I always recommend IP cameras with built-in infrared LEDs for the highest quality nighttime video surveillance footage.
Seeing What the Human Eye Can’t
We can’t see it, but infrared (IR) light is actually all around us. IR cameras detect these invisible wavelengths, and use infrared light to illuminate images in the dark. Most IR cameras have a series of infrared LEDs (often situated around the lens) that transmit infrared light at night, or whenever the camera switches to night mode.
Since infrared light can interfere with color images, most IR cameras have a cut-off filter to block it during the daytime. The filter sits between the camera’s lens and sensor, allowing visible light to pass through in the daytime while blocking out infrared wavelengths. Once the light level drops to a certain point, the filter shifts to allow infrared light in. This process is sometimes called True Day/Night (TDN) because it delivers true color images during the day, and black and white or “night vision” images at night.
In situations where there is minimal to no ambient light (for example, nighttime surveillance of retail stores or office buildings with no windows or natural light), even a TDN camera will not provide a crystal-clear image. You need powerful IR illuminators to light up complete darkness.
Some Helpful Tips
To capture details in the dark, make sure that the camera you’re deploying has an IR illumination distance that is sufficient for the area you need to capture. Lower quality night vision cameras might have multiple LED lights, but they may only brighten objects several feet away. Look at the specification sheet or test the camera to see if it provides adequate illumination distance. Higher quality IR cameras can illuminate objects 150 feet (45 meters) away or more.
Even at closer distances, it’s good to try out the camera so you know what to expect.
In Example 1 above, you can see what happens when IR is enabled, versus when it’s not. See how the IR camera on the left keeps illuminating the subject, even at 0 lux, while the camera on the right without IR is unable to pick up anything? Without IR, the field of view eventually goes black.
Avoiding Whiteouts
If you’ve deployed IR cameras in the past, you may have experienced an unfortunate “whiteout” effect, where the camera’s IR has over illuminated an object to the point where it’s no longer visibly discernable. This can happen when an object moves too close to the camera.
To avoid this pitfall, look for cameras with dynamic smart IR or built-in LEDs that automatically adjust to compensate for the distance of an object to ensure proper exposure.
In our video demonstration (Example 2), the video on the right was captured using an outdoor IR dome camera with dynamic smart IR, while the video on the left was captured with this feature disabled.
You can see that when the subject (me, in this case!) gets close to the camera, the camera LEDs on the left over illuminate my face, making it hard to see my facial features. With dynamic smart IR, however, there’s more uniform illumination and a better overall picture quality.
Dynamic smart IR cameras reduce the “whiteout” effect by automatically adjusting the light to provide consistent illumination, regardless of how far an object is from the camera. This is particularly helpful if you’re monitoring smaller indoor spaces, where objects or people are able to get close to the camera. If, however, you are monitoring larger spaces, like a stadium or parking lot, dynamic smart IR is not helpful. In these cases, I recommend turning off the dynamic smart IR, and just using IR only.
Deciding What You Need
To summarize, night vision cameras can be a great complement to your overall security plan, but it’s important to know what type of camera you need and when to use dynamic smart IR.
- Consider your application. Do you need indoor or outdoor nighttime surveillance? And how large is your surveillance coverage area? Make sure to choose a camera that’s built for your specific application, and has the lens and or zoom capacity you require.
- Tailor the infrared technology to your needs. Use dynamic smart IR for nighttime coverage in smaller, indoor areas. Turn dynamic smart IR off and use only IR for larger areas like parking lots and stadiums.
- Consider illumination distance. Review your camera’s technical specifications to make sure its IR capabilities can cover the distance you need. Consider adding a separate IR beam to supplement illumination at nighttime, if required.
Looking for a reprint of this article?
From high-res PDFs to custom plaques, order your copy today!


